NIO三大核心之缓冲区(Buffer)
缓冲区(Buffer)
基本介绍
缓冲区(Buffer):缓冲区本质上是一个可读可写的内存块。
可以理解成一个数组,该对象提供了一组方法,可以轻松的操作内存块。
缓冲区内置了一些机制,能够跟踪和记录缓冲区的状态变化情况。
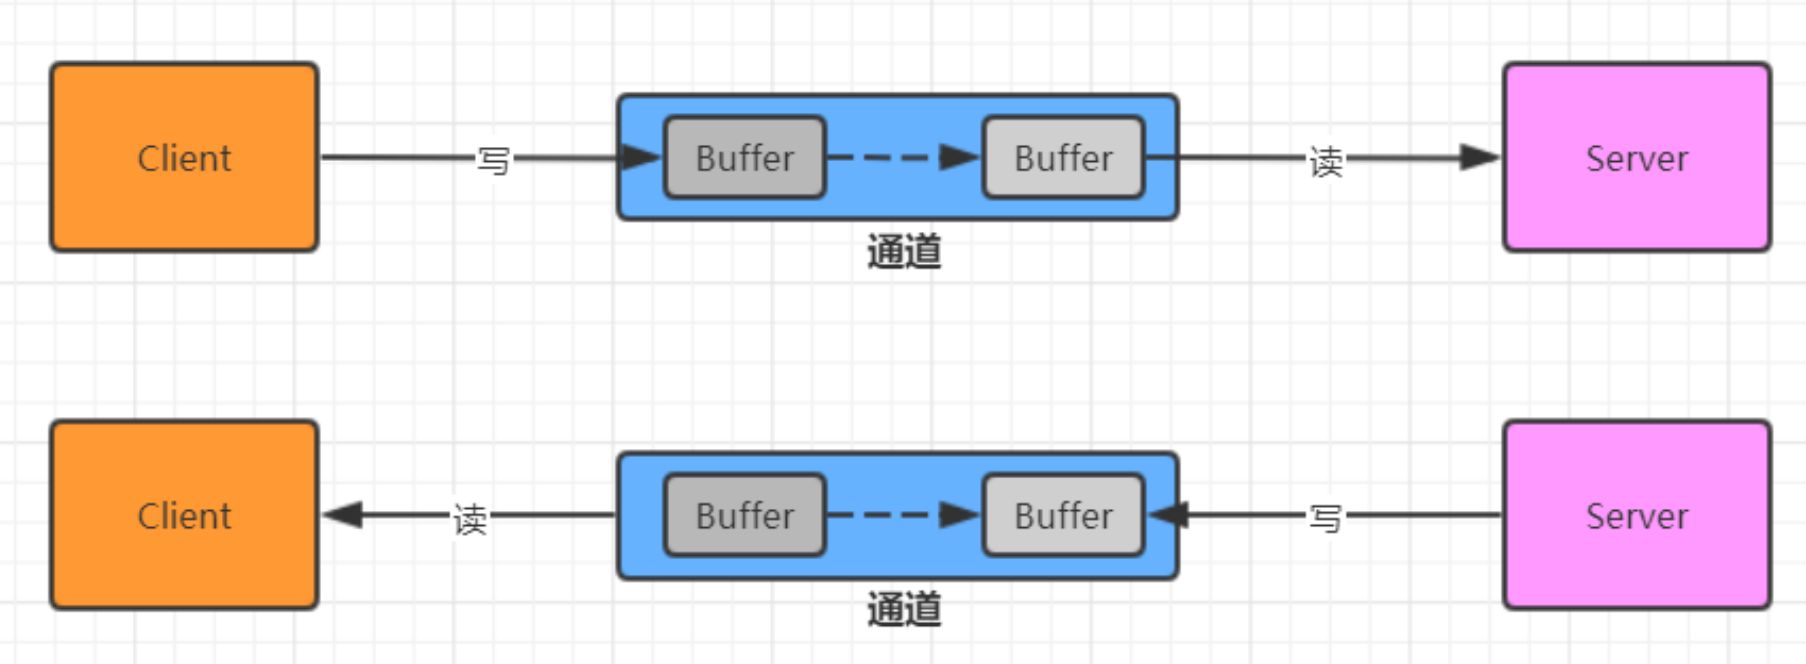
Channel提供从网络读取数据的通道,但是读取或者写入数据都必须经过Buffer。
Buffer常用API介绍
Buffer类及其子类
1
2
3
4
5
6
7
8
9
10
11
12
13
14
15
16
17
18
classDiagram
direction BT
class Buffer
class ByteBuffer
class CharBuffer
class DoubleBuffer
class FloatBuffer
class IntBuffer
class LongBuffer
class ShortBuffer
ByteBuffer --> Buffer
CharBuffer --> Buffer
DoubleBuffer --> Buffer
FloatBuffer --> Buffer
IntBuffer --> Buffer
LongBuffer --> Buffer
ShortBuffer --> Buffer如果图片无法查看,请看这里
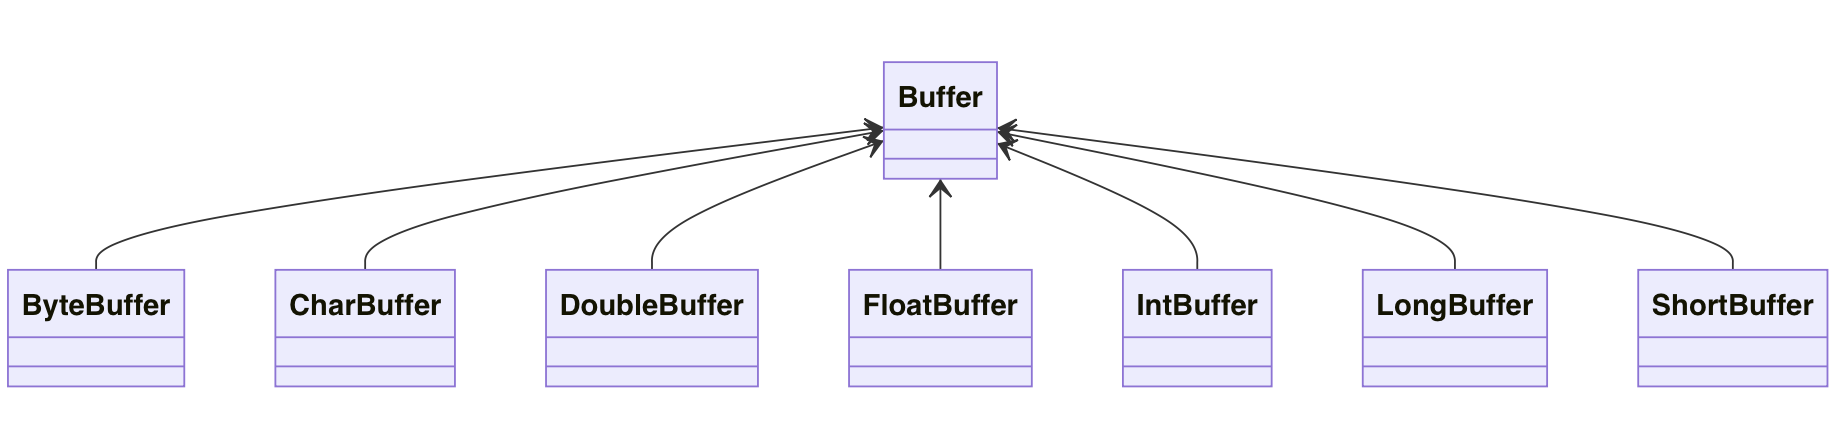
在NIO中,Buffer是一个顶层父类,他是一个抽象类。常用的缓冲区分别对应byte,char,double,float,int,long,short供7种。
缓冲区对象创建
方法名 说明 static ByteBuffer allocate(长度) 创建byte类型的指定长度的缓冲区 static ByteBuffer wrap(byte[] array) 创建一个有内容的byte类型的缓冲区 示例代码
1
2
3
4
5
6
7
8
9
10
11
12
13
14
15
16
17
18
19
20
21
22
23
24
25
26
27
/**
* 创建缓冲区
*
* @name: CreateBufferDemo
* @author: terwer
* @date: 2022-04-18 17:38
**/
public class CreateBufferDemo {
public static void main(String[] args) {
// 1.创建一个指定长度的缓冲区,ByteBuffer为例
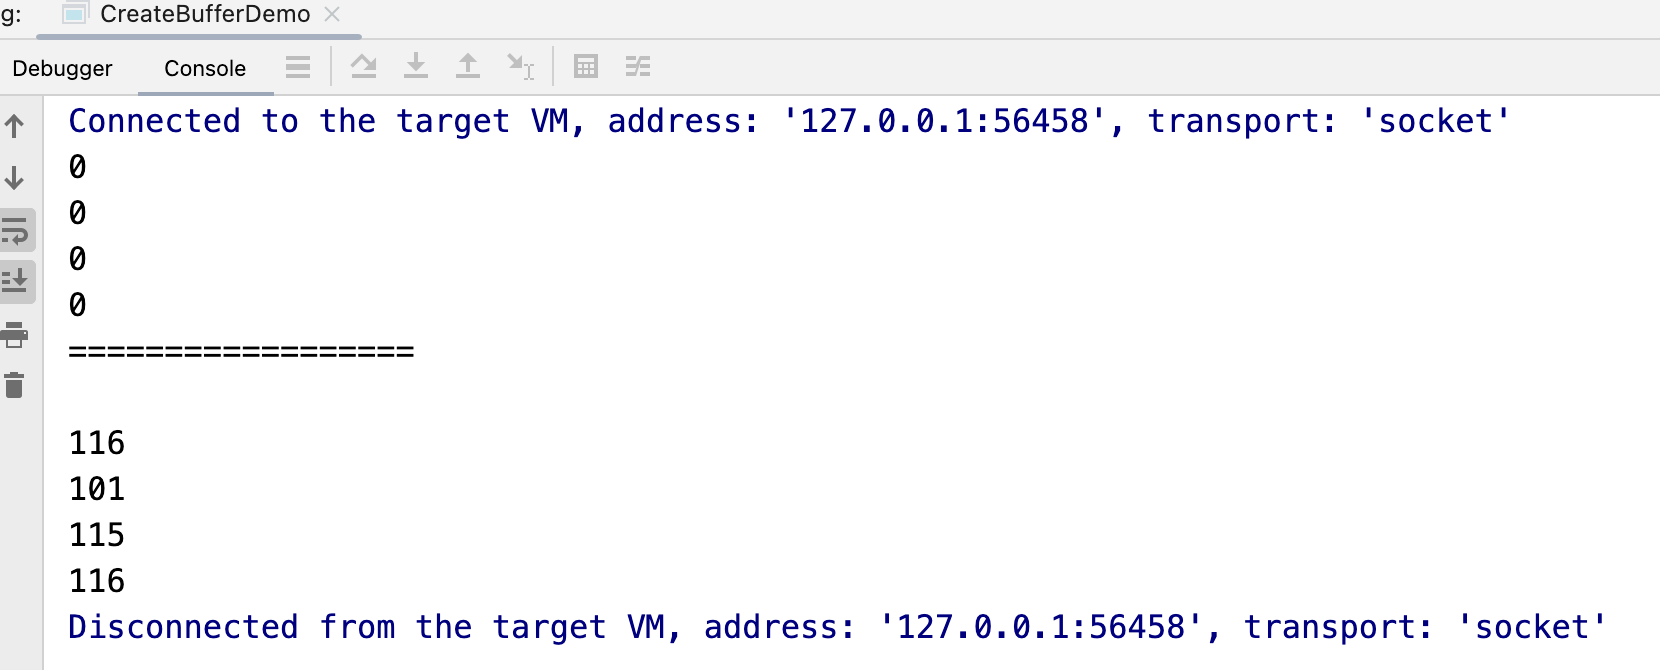
ByteBuffer byteBuffer = ByteBuffer.allocate(4);
for (int i = 0; i < 4; i++) {
System.out.println(byteBuffer.get());
}
// 在此调用会报错
// System.out.println(byteBuffer.get());
System.out.println("==================");
System.out.println();
// 2.创建一个有内容的缓冲区
ByteBuffer wrap = ByteBuffer.wrap("test".getBytes(StandardCharsets.UTF_8));
for (int i = 0; i < 4; i++) {
System.out.println(wrap.get());
}
}
}运行结果:
缓冲区对象添加数据
方法名 说明 Int position()/position(int newPosition) 获取当前要操作的索引/修改当前要操作的索引 int lkimit()/limit(int newLimit) 最多能操作到哪个索引/修改最多能操作的索引位置 int capacity() 返回缓冲区的总长度 int remaining()/boolean hasRemaining() 还有多少能操作的索引个数/是否还能操作 put (byte b)/put(byte[] src) 添加一个字节/添加字节数组 
示例代码:
1
2
3
4
5
6
7
8
9
10
11
12
13
14
15
16
17
18
19
20
21
22
23
24
25
26
27
28
29
30
31
32
33
34
35
36
37
38
39
40
41
42
43
44
45
46
47
48
49
50
51
52
53
54
55
56
57
58
59
60
61
62
63
/**
* 添加缓冲区
*
* @name: PutBufferDemo
* @author: terwer
* @date: 2022-04-18 19:27
**/
public class PutBufferDemo {
public static void main(String[] args) {
// 1.创建一个指定长度的缓冲区
ByteBuffer byteBuffer = ByteBuffer.allocate(10);
System.out.println(byteBuffer.position());// 获取当前索引所在的位置
System.out.println(byteBuffer.limit());// 最多能操作到哪个索引
System.out.println(byteBuffer.capacity());// 返回缓冲区总长度
System.out.println(byteBuffer.remaining());// 还有多少个能操作
// byteBuffer.position(2);
// byteBuffer.limit(4);
// System.out.println();
// System.out.println("============");
// System.out.println(byteBuffer.position());// 获取当前索引所在的位置
// System.out.println(byteBuffer.limit());// 最多能操作到哪个索引
// System.out.println(byteBuffer.capacity());// 返回缓冲区总长度
// System.out.println(byteBuffer.remaining());// 还有多少个能操作
// 添加一个字节
byteBuffer.put((byte) 97);
System.out.println();
System.out.println("============");
System.out.println(byteBuffer.position());// 获取当前索引所在的位置
System.out.println(byteBuffer.limit());// 最多能操作到哪个索引
System.out.println(byteBuffer.capacity());// 返回缓冲区总长度
System.out.println(byteBuffer.remaining());// 还有多少个能操作
// 添加一个字节数组
byteBuffer.put("test".getBytes(StandardCharsets.UTF_8));
System.out.println();
System.out.println("============");
System.out.println(byteBuffer.position());// 获取当前索引所在的位置
System.out.println(byteBuffer.limit());// 最多能操作到哪个索引
System.out.println(byteBuffer.capacity());// 返回缓冲区总长度
System.out.println(byteBuffer.remaining());// 还有多少个能操作
// 超过缓冲区长度会报错
// byteBuffer.put("1234567".getBytes(StandardCharsets.UTF_8));
// System.out.println();
// System.out.println("============");
// System.out.println(byteBuffer.position());// 获取当前索引所在的位置
// System.out.println(byteBuffer.limit());// 最多能操作到哪个索引
// System.out.println(byteBuffer.capacity());// 返回缓冲区总长度
// System.out.println(byteBuffer.remaining());// 还有多少个能操作
// 如果缓冲区满了,可以调整position的位置,会覆盖之前对应索引的值
byteBuffer.position(0);
byteBuffer.put("1234567".getBytes(StandardCharsets.UTF_8));
System.out.println();
System.out.println("============");
System.out.println(byteBuffer.position());// 获取当前索引所在的位置
System.out.println(byteBuffer.limit());// 最多能操作到哪个索引
System.out.println(byteBuffer.capacity());// 返回缓冲区总长度
System.out.println(byteBuffer.remaining());// 还有多少个能操作
}
}缓冲区对象读取数据
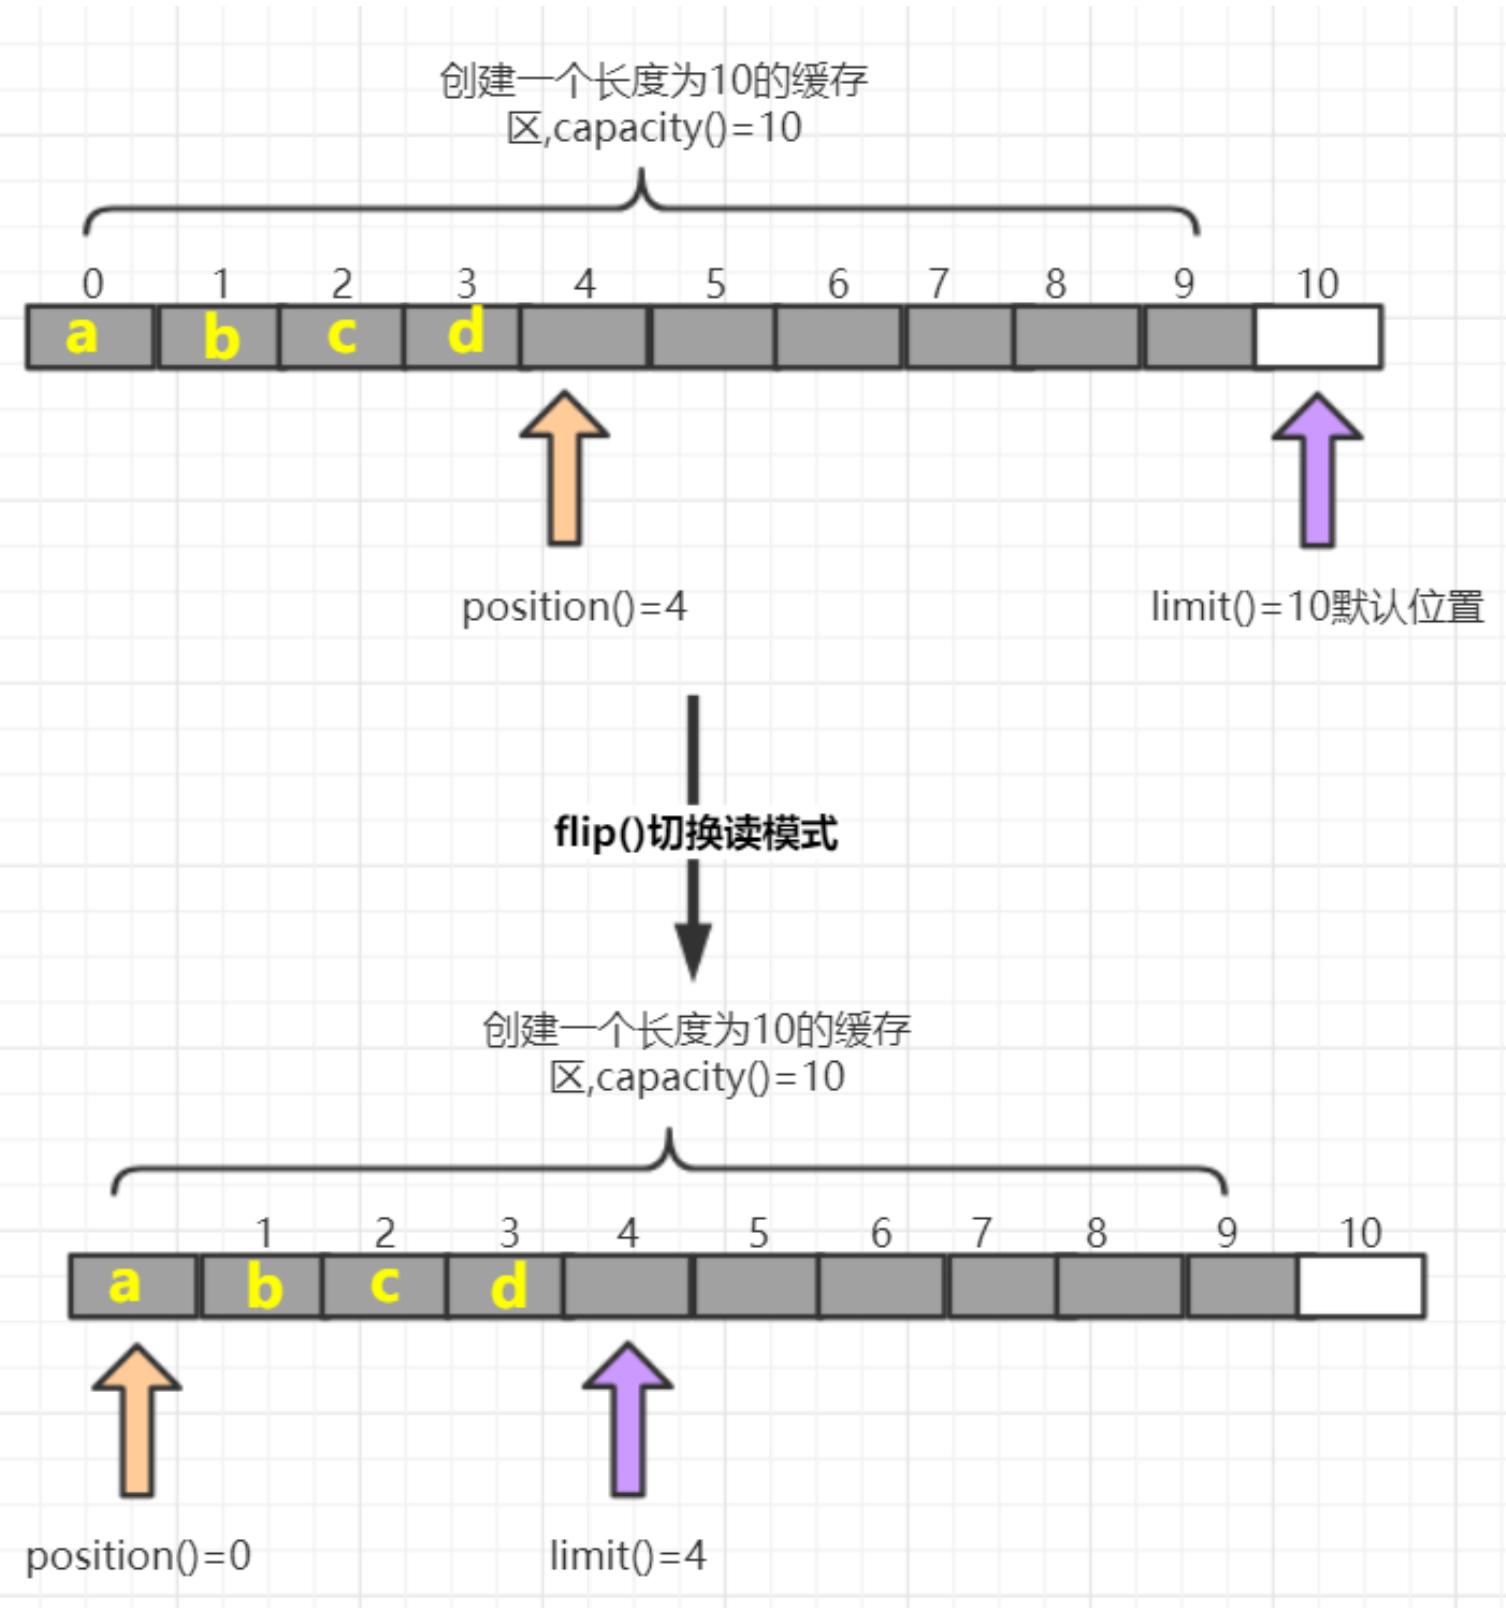
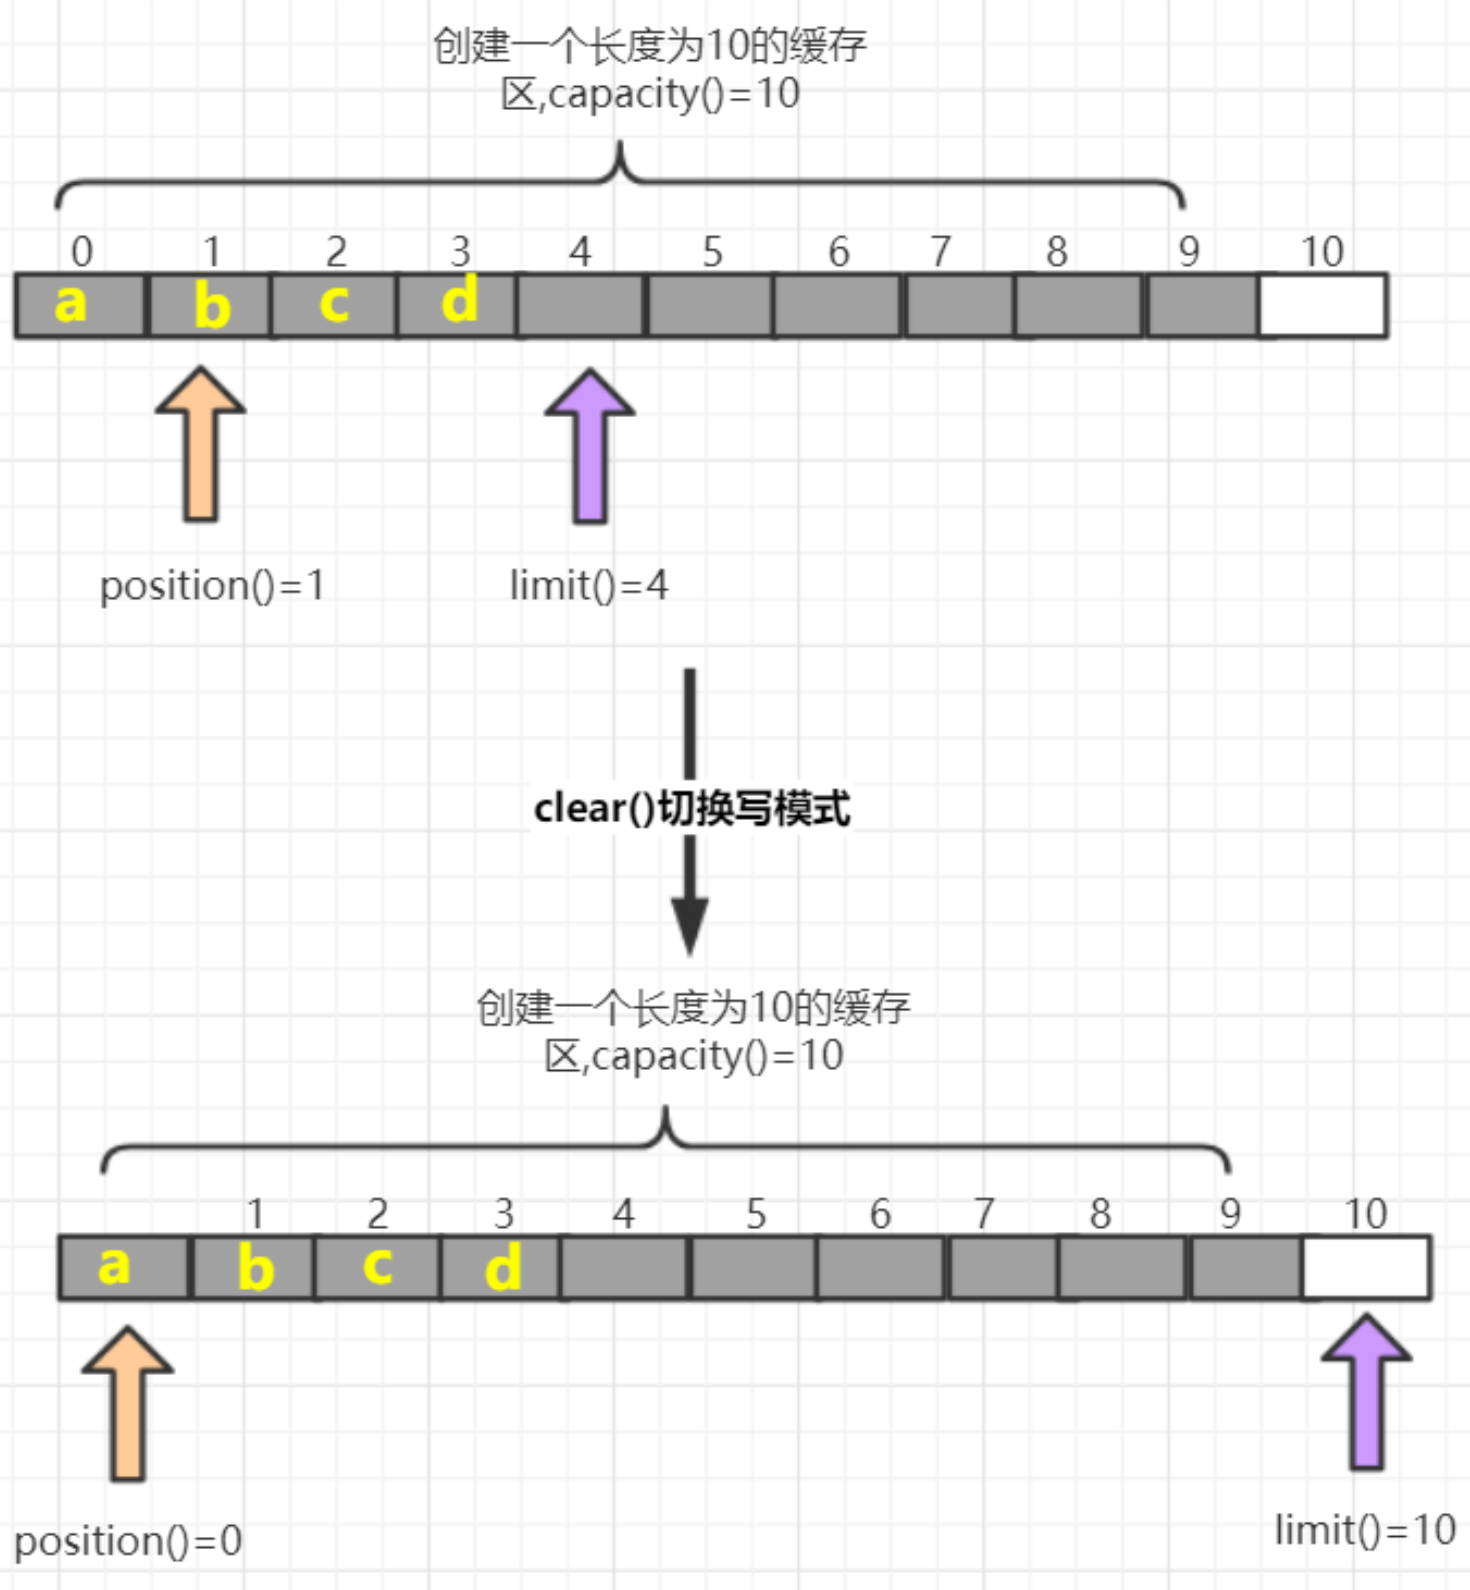
方法名 介绍 flip() 切换读模式,limit设置position位置,position设置0 get() 读一个字节 get(byte[] dst) 读多个字节 get(int index) 读指定索引的字节 rewind() 将position设置为0,可重复读 clear() 切换写模式,position设置为0,limit设置为capacity array() 将缓冲区转换成字节数组返回 flip方法:
clear方法:
示例代码:
1
2
3
4
5
6
7
8
9
10
11
12
13
14
15
16
17
18
19
20
21
22
23
24
25
26
27
28
29
30
31
32
33
34
35
36
37
38
39
40
41
42
43
44
45
46
47
48
49
50
51
52
53
54
55
56
57
58
/**
* 从缓冲区读取数据
*
* @name: GetBufferDemo
* @author: terwer
* @date: 2022-04-18 19:51
**/
public class GetBufferDemo {
public static void main(String[] args) {
// 1.创建一个指定长度的缓冲区
ByteBuffer byteBuffer = ByteBuffer.allocate(10);
byteBuffer.put("0123".getBytes(StandardCharsets.UTF_8));
System.out.println("position:" + byteBuffer.position());
System.out.println("limit:" + byteBuffer.limit());
System.out.println("capacity:" + byteBuffer.capacity());
System.out.println("remaining:" + byteBuffer.remaining());
// 切换读模式
System.out.println();
System.out.println("=================");
System.out.println("准备读数据:");
byteBuffer.flip();
System.out.println("position:" + byteBuffer.position());
System.out.println("limit:" + byteBuffer.limit());
System.out.println("capacity:" + byteBuffer.capacity());
System.out.println("remaining:" + byteBuffer.remaining());
for (int i = 0; i < byteBuffer.limit(); i++) {
System.out.println(byteBuffer.get());
}
// 读取完毕后,继续读取会报错,超过limit
// System.out.println(byteBuffer.get());
// 读取指定字节
// System.out.println("读取指定索引:");
// System.out.println(byteBuffer.get(2));
System.out.println("读取多个字节:");
// 重复读取
byteBuffer.rewind();
byte[] dst = new byte[4];
byteBuffer.get(dst);
System.out.println(new String(dst));
// 将缓冲区转化为字节数组返回
System.out.println();
System.out.println("===========");
System.out.println("将缓冲区转化为字节数组:");
byte[] array = byteBuffer.array();
System.out.println(new String(array));
// 切换写模式,会覆盖之前所有的值
System.out.println();
System.out.println("================");
System.out.println("切换写模式,覆盖之前的值:");
byteBuffer.clear();
byteBuffer.put("test".getBytes(StandardCharsets.UTF_8));
System.out.println(new String(byteBuffer.array()));
}
}注意:
- capacity:容量(长度) limit:界限(最多能读/写到哪里) position:位置(读/写哪个索引)
- 获取缓冲区的数据之前,要先调用flip()方法,重复读需要调用rewind()方法
- 再次写数据之前,需要先调用clear()方法,此时数据还未消失。再次写入数据完成,数据覆盖了才会消失。
NIO三大核心之缓冲区(Buffer)
https://hexo.terwer.space/post/buffer-of-nio-three-cores.html