通道(Channel)
基本介绍
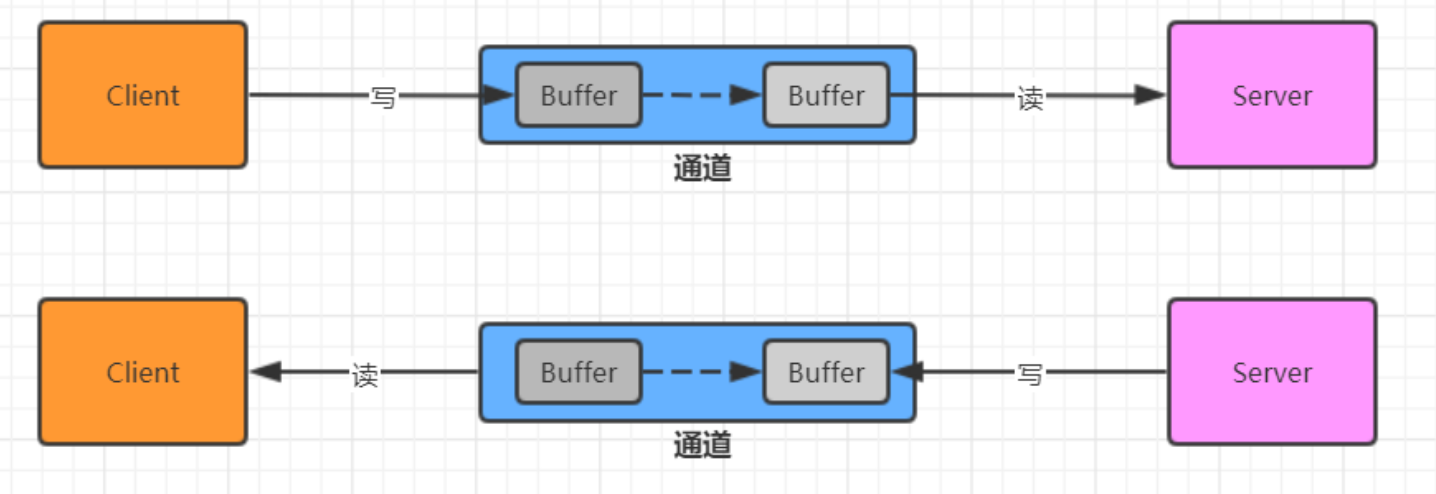
NIO中所有的IO都是从通道(Channel)开始的。NIO的通道类似于流,但是有区别:
通道可读可写,流一般是单向的(只能读或者写,所以之前socket的demo里面分别创建一个输入流和输出流)。
通道可以异步读写。
通道总是基于缓冲区Buffer来读写
Channel的常用类介绍
Channel接口
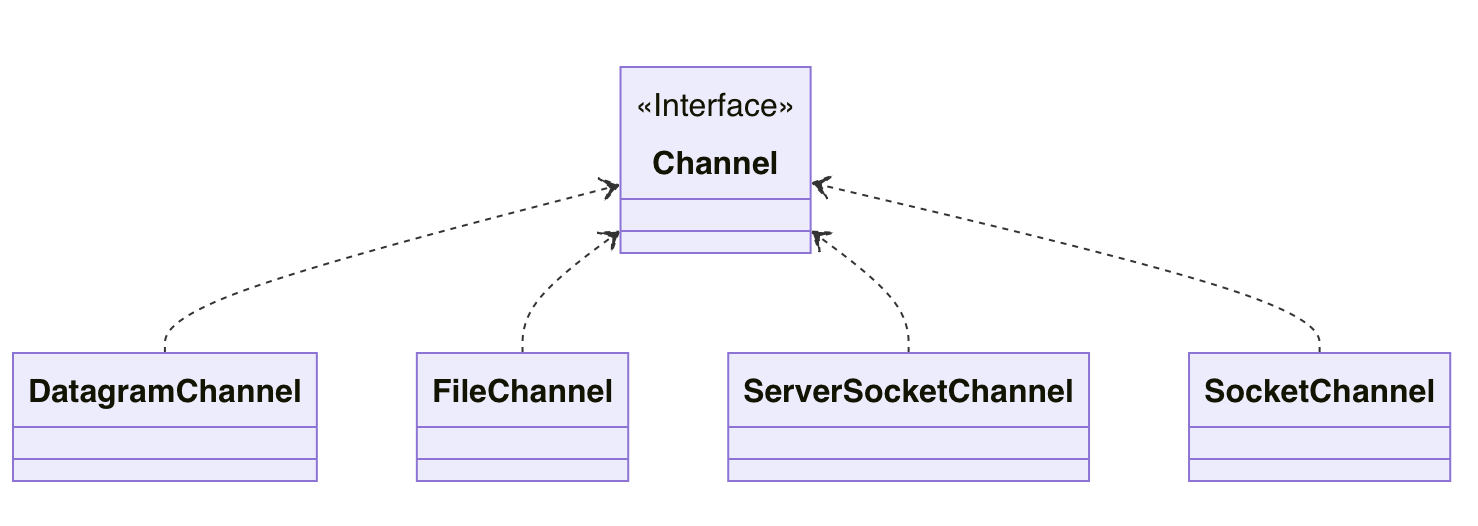
常用的Channel实现类有:FileChannel、DatagramChannel、ServerSocketChannel和SocketChannel
FileChannel用于文件的数据读写,DatagramChannel用于UDP数据的读写,ServerSocketChannel和SocketChannel用于TCP数据的读写。
ServerSocketChannel类似于ServerSocket,SocketChannel类似于Socket。
1
2
3
4
5
6
7
8
9
10
11
12
13
14
15
| classDiagram
direction BT
class Channel {
<<Interface>>
}
class DatagramChannel
class FileChannel
class ServerSocketChannel
class SocketChannel
DatagramChannel ..> Channel
FileChannel ..> Channel
ServerSocketChannel ..> Channel
SocketChannel ..> Channel
|
如果无法显示图片,请看这里
SocketChannel和ServerSocketChannel
类似于Socket和ServerSocket,可用于客户端与服务器的通信。
ServerSocketChannel
服务端实现步骤:
- 打开一个服务端通道
- 绑定对应的端口号
- 通道默认是阻塞的,需要设置为非阻塞
- 检查是否有客户端连接,有客户端连接会返回对应的通道
- 获取客户端传递过来的数据,并把数据放在byteBuffer这个缓冲区中
- 给客户端回写数据
- 释放资源
1
2
3
4
5
6
7
8
9
10
11
12
13
14
15
16
17
18
19
20
21
22
23
24
25
26
27
28
29
30
31
32
33
34
35
36
37
38
39
40
41
42
43
44
|
public class NIOServer {
public static void main(String[] args) throws IOException, InterruptedException {
ServerSocketChannel serverSocketChannel = ServerSocketChannel.open();
serverSocketChannel.bind(new InetSocketAddress(9999));
serverSocketChannel.configureBlocking(false);
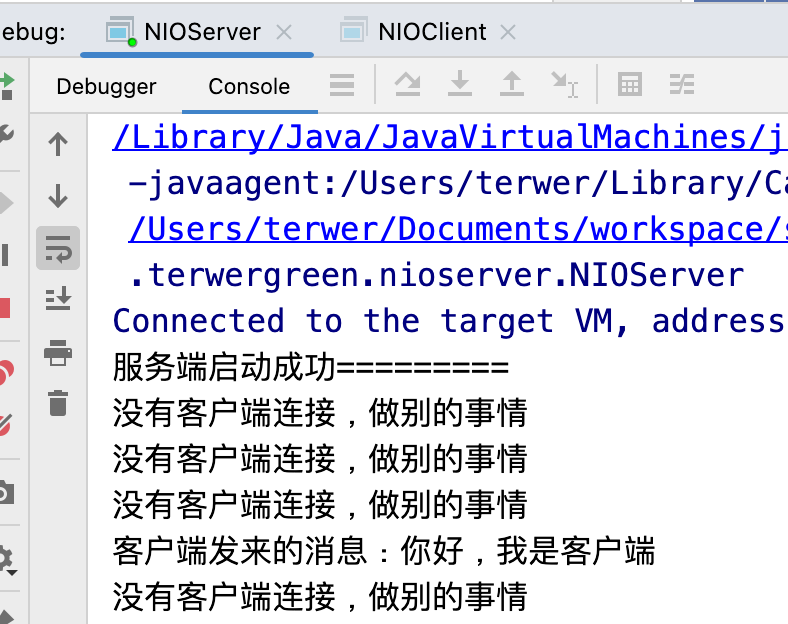
System.out.println("服务端启动成功=========");
while (true) {
SocketChannel socketChannel = serverSocketChannel.accept();
if (socketChannel == null) {
System.out.println("没有客户端连接,做别的事情");
Thread.sleep(2000);
continue;
}
ByteBuffer byteBuffer = ByteBuffer.allocate(1024);
int read = socketChannel.read(byteBuffer);
System.out.println("客户端发来的消息:" + new String(byteBuffer.array(), 0, read));
socketChannel.write(ByteBuffer.wrap("你好,我是服务端".getBytes(StandardCharsets.UTF_8)));
socketChannel.close();
}
}
}
|
SocketChannel
客户端实现步骤:
- 打开通道
- 设置连接IP和端口号
- 写出数据
- 读取服务器写回的数据
1
2
3
4
5
6
7
8
9
10
11
12
13
14
15
16
17
18
19
20
21
22
23
|
public class NIOClient {
public static void main(String[] args) throws IOException {
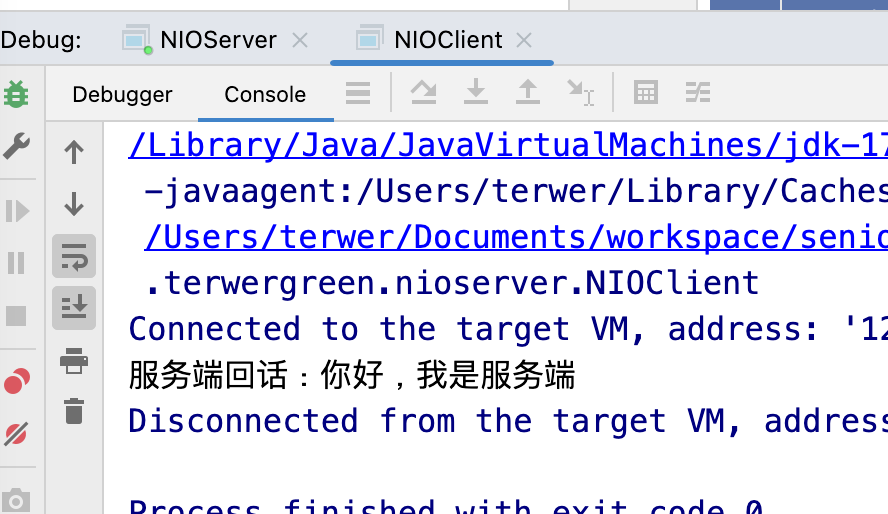
SocketChannel socketChannel = SocketChannel.open();
socketChannel.connect(new InetSocketAddress("127.0.0.1", 9999));
socketChannel.write(ByteBuffer.wrap("你好,我是客户端".getBytes(StandardCharsets.UTF_8)));
ByteBuffer byteBuffer = ByteBuffer.allocate(1024);
int read = socketChannel.read(byteBuffer);
System.out.println("服务端回话:" + new String(byteBuffer.array(), 0, read));
socketChannel.close();
}
}
|
运行效果